This project is a headboard for a dorm bed for my daughter.
 First I started with measurements from the dorm taken at orientation. I wanted the headboard to hid the ugly bed frame and to provide a comfortable spot to lean back on when studying in bed. The be width was almost 38″ and I had read that other parents suggested a width of 40″ to give a little bit extra on each side to make sure it did not fall through the bedframe.
Next was figuring the height. The mattress allowing for a topper would be around 8″. I also measured my back length to the top of my head while sitting was around 33″. Then I allowed an extra inch to come up with my height of 42″.
So my final size was 40″W and 42″ H.
The items I used to make the headboard were
- A sheet of 1/2″ thick MDF from Home Depot for around $24. You could have easily made 2 headboards from the one sheet.
- A can of 3M General Purpose 45 Spray Adhesive, purchased from Amazon, about $6. I liked this spray glue. I was afraid of a lot of smell, and this was low on odor.
- Mainstays 1.5″ Memory Foam Combo Mattress Topper in full size, $19. I purchased online at Walmart and delivered to store (I struggled with finding a good place to purchase the foam. This ended up being the cheapest solution. I could not find foam wide enough locally and did not want to have to piece it. Now I have a huge scrap and don’t know what to do with it.)
- Thickest batting from JoAnn’s (don’t remember the cost, but was not expensive compared to the rest). I think I bought about 48″ length.
- Fabric. I used a set of wide curtains purchased at Tuesday Morning. If using curtains, make sure the panels will be wide enough to cover the 40″ width of the board plus have room to wrap, around 46″ width. If buying fabric, you would need about a 48″ length.
- Staple gun, 1/4″ staples seemed fine
You could have easily made two headboards from the sheet. They will even cut it for you.
We picked this shape out of tons of examples on the internet. I made a quick paper pattern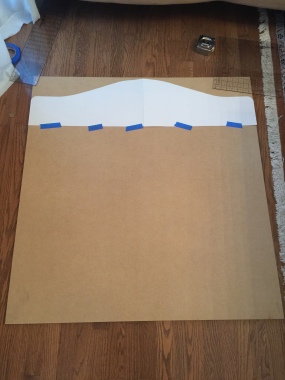 from poster paper. To make the pattern, I cut the paper in two 10″x 20″ strips and taped the two sections together. This let me easily fold them in half and cut the desired shape. After a couple of tries to get the shape perfected. I taped the pattern in place and penciled in the cutting line.
My husband did an excellent job of cutting on the line with the jigsaw.
I had intended on taking lots of photos of the assembly and providing a ton of details. Turned out that life got in the way and there are no photos of the process. I will detail the process as much as possible.
I had a bit of a issue with the foam. When I unboxed it and opened it out, it was horribly flat and crumpled. The papers that came with it said that it takes 5-7 days for it to return to size. I was not expecting this. I spread it out in a spare room and it took at least 2 days before I felt like it would be uncrumpled enough to work with.
For the rest of the process I cut down the foam to a bit bigger than approximate size of the MDF. I wanted it to hang off each side by a couple of inches. This is because it is tricky to place the foam on the board and you only get one try. Once it is in place and stuck down, you can trim it with a blade. Cut the foam and have it ready, because once you spray the 3M glue you are on the clock.
Spray glue is a garage/ outside thing, so all the spray gluing was done outside. I sprayed a nice even coating of the spray glue. The can instructions say to spray and then wait until not wet, but still tacky. The can explains it well, so I won’t. Read the can.
I had my husband help me to lower the foam down on the tacky glue and press into it. I was worried about the foam sticking evenly, so we brought it inside and laid it on the floor for about 20 minute or so foam side down so that the weight of the MDF would press the foam to the board and help it adhere.
Once I felt comfortable that the foam was stuck, I trimmed the excess off. I used the shape of the board as my guide and slanted the knife at an angle so that the foam was actually a little bigger than the board. I wanted there to be a little foam to wrap the edges of the board along with the batting.
You will want batting to hang off every side of the headboard. This will make the edges nice. You can do any trimming of excess after the project is finished and the fabric has been stapled in place. Next we went back to the garage and gave the foam a light coating of spray. I did not wait quite as long before placing the batting down on top of the foam, since the batting is porous and I knew that any dampness would dry. I think that I waited maybe about 30 minutes, before bringing it back inside to staple on the fabric.
The last part was to lay the fabric down on the floor, lay headboard down on top and start stapling the fabric. Don’t pull too tightly or the edges will look pulled. Staple a bit at the top and then at the bottom, then a bit on the left and then a bit on the right. Make the corners neat, by folding the fabric with many small folds. When you are done stapling, use a hammer to pound down any staples that aren’t completely flat.
I used the left over fabric to make two pillow shams to cover some nice European pillow squares from Tuesday Morning.
I will add that we did not need anything to attach the headboard. It is actually quite heavy, but it fit perfectly between the mattress and the headboard and the mattress holds it firmly in place. I was afraid that it would flop forward and that I would need to use something on the back to tie it to the bed, but it was fine. Your situation might be different and you might need to attach it somehow. Use your own judgement.
I was proud of the project and my daughter loved it. Here are some photos of the finished project.

